- Use Case description
- Device Claiming scenarios
- Device Claiming Permissions in PE
- Device Claiming Widget
- Device Claiming API Request
- Device Reclaiming API Request
- Python example scripts
- Next steps
Use Case description
As a Tenant, I would like to pre-provision my devices via script or UI. My customers purchase devices directly from me or through the distributors. I would like my customers to claim their devices based on the QR code or similar technique, once they get physical access to the device.
Once device is claimed, the customer becomes its owner and customer users may access device data as well as control the device.
Device Claiming scenarios
IoT Hub User can claim the device if they “know” the device Name and Secret Key. The Secret Key is optional, always has an expiration time, and may also change over time.
The Secret Key may be provisioned in two different ways:
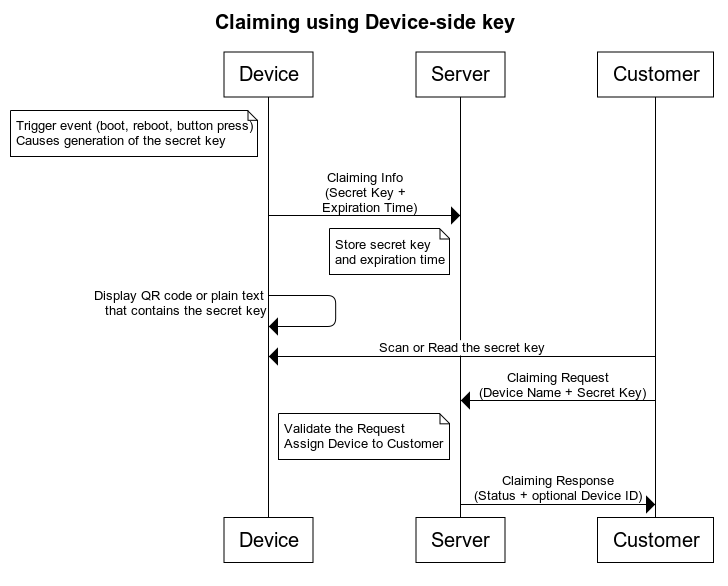
- Device-side key scenario - Device contains expirationTime server attribute with expiration timestamp. The device sends claiming request to IoT Hub with claiming data and only after this customer is able to claim device by using device claiming widget.
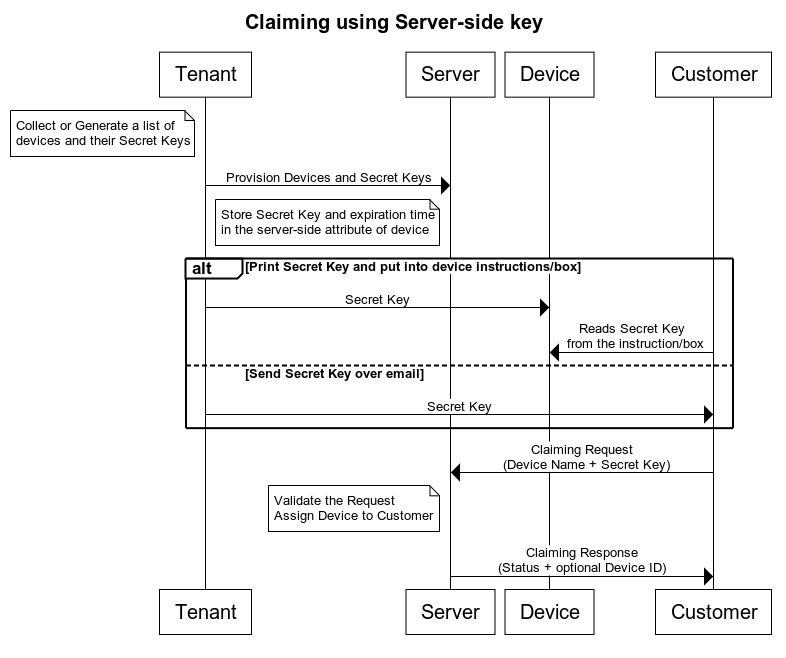
- Server-side key scenario - Device contains claimingData server attribute with claiming data and customer claim device using claim device widget.
See below for more details.
|
This procedure requires device to generate the Secret Key based on some trigger event. For example, once device is booted or when some physical button is pressed. Once the Secret Key is generated, it is valid for certain period of time. The device sends Claiming Information to the server which contains both the Secret Key and the duration of the validity of the key. IoT Hub server stores Claiming Information for the duration of the validity of the key. See diagram below.
Device may send Claiming Information to TB using all supported transport protocols. The message body has two parameters: secretKey and durationMs, which may be optionally specified. The secretKey parameter adds security to the claiming process. The durationMs parameter determines the expiration of claiming time. In case the secretKey is not specified, the empty string as a default value is used. In case the durationMs is not specified, the system parameter device.claim.duration is used (in the file /etc/thingsboard/conf/thingsboard.yml). Please see the Device API references to get the information about the message structure and topics/URLs to which to send the claiming messages. You can use the MQTT Gateway API that allows initiating claiming of multiple devices per time as well. Once the Claiming Info is sent, device may display the Secret Key either in plain text or using the QR code. User should scan this key and use it to send the Claiming Request. Claiming Request consists of the device Name and Secret Key. You may use MAC address or other unique property as the device Name. See instructions how to send the Claiming Request here. Note: The Secret Key may also be an empty string. This is useful if your device does not have any way to display the Secret Key. For example, you may allow to claim device within 30 seconds after the claim button is pressed on the device. In this case user needs to know the device Name (MAC address, etc) only. Server validates the Claiming Request and replies with the Claiming Response. Claiming Response contains status of the Claiming operation and Device ID if the operation was successful. Once Claiming Information is provisioned, Customer User may use Claim Device widget. |
|
Let’s assume you have thousands of NB IoT/LoRaWAN/Sigfox devices connected using one of IoT Hub Integrations. The integration layer will automatically provision them in IoT Hub. Assuming Tenant Admin knows the list of DevEUIs (LoRaWAN) or any other device identifiers, it is possible to generate a random Secret Key per device and upload this key to IoT Hub as a server-side attribute using REST API or UI. Once this is done, tenant admin can email those keys to the Customer, or put them inside the device package box.
In order to provision device Secret Key, Tenant Administrator should set server-side attribute “claimingData” like the following value: , where expiration date is the end of the time when the device can be claimed that is 01/01/2022 as a unix timestamp with milliseconds precision. Once server-side attribute is provisioned, Customer User may use Claim Device widget. |
Device Claiming Permissions in PE
It is important to know that in the case of the PE version the user that is trying to claim the specific device must have the necessary permissions to do so. In this case, the needed permission is the following:
- Resource: Device
- Operation: Claim devices
Let’s add the above permission for a custom claiming user group.
- Create a generic role.
- Assign that role for a user group.
Device Claiming Widget
- You are able to find Device Claiming Widget in Static widget section of Input widgets bundle.
- Claim device widget is quite simple and allows to input device name and Secret Key.
- It is possible to "hide" Secret Key input field and change the labels in "General settings".
- It is also possible to configure all sorts of messages to the user in "Message settings".
- Finally, you can relate the claimed device to the current state entity of the dashboard.
This is useful if you have multiple assets and would like to relate your device to one of them.
Device Claiming API Request
The Claiming Request is sent as a POST request to the following URL:
1
http(s)://host:port/api/customer/device/$DEVICE_NAME/claim
The supported data format is:
1
2
3
{
  "secretKey":"value"
}
Note: the message does not contain durationMs parameter and the secretKey parameter is optional.
Whenever claiming is succeed the device is being assigned to the specific customer. The claimingAllowed attribute is automatically deleted in case the system parameter allowClaimingByDefault is false.
In addition, there is a possibility to reclaim the device, which means the device will be unassigned from the customer. The claimingAllowed attribute will appear again in case the allowClaimingByDefault is false.
See the following for more details regarding the above steps.
Device Reclaiming API Request
In order to reclaim the device, you can send DELETE request to the following URL (Don’t forget to replace device name with the correct name):
1
curl -X DELETE https://iothub.magenta.at/api/customer/device/$DEVICE_NAME/claim
You will receive the response like the following one:
1
2
3
4
{
  "result": {},
  "setOrExpired": true
}
Python example scripts
In this section you may get examples of code for claiming device feature.
We will use tb-mqtt-client python module to connect and claim device.
You are able to install it using the following command:
1
pip3 install tb-mqtt-client --user
Basic claiming example
Let’s assume we have a device on tenant level and configured customer, like it is described above.
At the moment, we want to connect the device and send claiming request to assign it to customer.
Case description:
We have a device on ThingsBord with a name Test claiming device.
The device has access token credentials - Eypdinl1gUF5fSerOPJF.
We should download the script above and run it to send claiming request to the server.
1
2
3
4
5
6
7
8
9
10
11
12
13
14
15
16
17
18
19
20
21
22
23
24
25
26
27
28
29
30
31
32
33
34
35
36
37
38
39
40
41
42
43
44
45
46
47
48

#
# Copyright © 2016-2020 The IoT Hub Authors
#
# Licensed under the Apache License, Version 2.0 (the "License");
# you may not use this file except in compliance with the License.
# You may obtain a copy of the License at
#
#     http://www.apache.org/licenses/LICENSE-2.0
#
# Unless required by applicable law or agreed to in writing, software
# distributed under the License is distributed on an "AS IS" BASIS,
# WITHOUT WARRANTIES OR CONDITIONS OF ANY KIND, either express or implied.
# See the License for the specific language governing permissions and
# limitations under the License.
#

from tb_device_mqtt import TBDeviceMqttClient

def collect_required_data():
    config = {}
    print("\n\n", "="*80, sep="")
    print(" "*20, "IoT Hub basic device claiming example script.", sep="")
    print("="*80, "\n\n", sep="")
    host = input("Please write your IoT Hub host or leave it blank to use default (iothub.magenta.at): ")
    config["host"] = host if host else "iothub.magenta.at"
    token = ""
    while not token:
        token = input("Please write accessToken for device: ")
        if not token:
            print("Access token is required!")
    config["token"] = token
    config["secret_key"] = input("Please write secret key for claiming request: ")
    if not config["secret_key"]:
        print("Please make sure that you have claimData in server attributes for device to use this feature without device secret in the claiming request.")
    duration_ms = input("Please write duration in milliseconds for claiming request or leave it blank to use default (30000): ")
    config["duration_ms"] = int(duration_ms) if duration_ms else 30000
    print("\n", "="*80, "\n", sep="")
    return config


if __name__ == '__main__':
    config = collect_required_data()
    client = TBDeviceMqttClient(host=config["host"], token=config["token"])
    client.connect()
    client.claim(secret_key=config["secret_key"], duration=config["duration_ms"]).get()
    print("Claiming request was sent, now you should use claiming device widget to finish the claiming process.")
Then we are able to use Device Claiming Widget.
Next steps
- Getting started guides - These guides provide quick overview of main IoT Hub features. Designed to be completed in 15-30 minutes.
-
Connect your device - Learn how to connect devices based on your connectivity technology or solution.
-
Data visualization - These guides contain instructions how to configure complex IoT Hub dashboards.
-
Data processing & actions - Learn how to use IoT Hub Rule Engine.
-
IoT Data analytics - Learn how to use rule engine to perform basic analytics tasks.
-
Hardware samples - Learn how to connect various hardware platforms to IoT Hub.
-
Contribution and Development - Learn about contribution and development in IoT Hub.


